
and Copycat Kirklands Burlap Pumpkins

When shopping recently in the US, I went into Kirklands in the Walden Galleria Mall.
I noticed these burlap pumpkins that had stenciled fall on them.
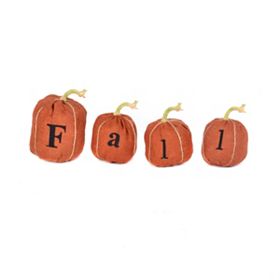
They were priced at $24.99.
I have burlap and stencils so I knew I could do a copycat.
So let's begin.
This is what you will need:
hot glue gun
burlap
paint
stencils
needle
string
jute twine
wooden spools
poly fil stuffing
Cut burlap into 17" x 10" 4x
Fold over and stitch down one side.


Once dry it's time to stuff with poly fil stuffing. Don't be stingy. Fill it up.

Time to pull out the string and needle once again and do a running stitch across the top.

Pull tight and secure the string.

Next we are going to add the jute twine by wrapping it around the burlap to make a pumpkin.

The wooden spools are wrapped in the jute twine and then hot glued onto the top the the
pumpkin.

This was a fun and easy project at a quarter of the price.

Again mine........
Kirklands
Thanks for stopping by and leaving all your lovely comments.
Have a great Holiday Weekend!
Linda
I'm linking with these fun parties:
Met Monday
Southern Hospitality
Coastal Charm
Cozy little House
A Stroll thru Life
DIY by Design
Savvy Southern Style
Have a daily cup of Mrs. Olson
Stone Gable
2805
Common Ground
AKA Designs
Jennifer Rizzo
Boogie Board Cottage
Domestically speaking

Very very cool!! And I like your FALL letters better :-)
ReplyDeleteLinda, these are fantastic! You did an excellent job and yours are so much better looking than theirs!
ReplyDeleteThese are really cute Linda and I think they look better than the store ones. Great job!
ReplyDeleteThe wooden spools make your's the winner! ~ Maureen
ReplyDeleteThey are sooooo cute Linda! I love the wooden spools!! Enjoy your weekend, Gail
ReplyDeleteLinda those are super cute!! Great job!
ReplyDeleteI keep losing my comments....grrrrr
ReplyDeleteThese are so stinkin' cute, Linda....I am so bad at stenciling, I will have to practice a lot before attempting these. :)
Linda...These are great...I will have to make some...Thanks for the tutorial...Blessings, Becky
ReplyDeleteI like yours better! Thank you for sharing. Visiting from Boogieboard. Would love it if you would share this at my Make it Pretty Monday party at The Dedicated House. http://thededicatedhouse.blogspot.com The party goes live on Monday mornings. Hope to see you at the bash! Toodles, Kathryn @TheDedicatedHouse
ReplyDeleteSo adorable! Thanks for showing the DIY!
ReplyDeleteJeanine
Your pumpkins are adorable- I like yours MUCH better than the K version! Thanks for the great tutorial- maybe I'll give some a try! :)
ReplyDeleteWow Linda! I think yours are so much cuter than the store's!! Great job recreating something expensive at a much lower price! Love this project!
ReplyDeleteDebbie :)
These are so cute!! I may have to make a few for the fall. Thanks
ReplyDeleteRhonda
Hi Linda,
ReplyDeleteYour Fall pumpkins are really cute.
Dee
You are so clever. I absolutely love these. Great tutorial. Thanks for joining TTT. Hugs, Marty
ReplyDeleteLinda I sure like yours better! I have never tried painting on burlap, but I will now. Love the twine covered spools too. Happy to be following you via GFC and looking forward to more!
ReplyDeleteI like yours better too! Adorable.
ReplyDeleteYours are much cuter than Kirklands!!
ReplyDeleteI like yours better, I think the capital letters are needed:@)
ReplyDeletethose are so cute. Definitely like yours better; the spool stem really makes them stand out! Now following.
ReplyDeleteLinda, your pumpkins are MUCH cuter! Love them!
ReplyDeleteWhat a great idea! I think your pumpkins are so much cuter than the Kirkland's ones!
ReplyDeleteHave a great day rock star!
karianne
Linda,
ReplyDeleteLove your cute pumpkins. I am such a sucker for burlap. Thanks for sharing your wonderful tutorial with Share Your Cup.
Hugs,
Jann
Wow-you did a great job!! (I agree with everyone else, yours are cuter!) I'm visiting from Boogieboard and am your newest follower :)
ReplyDeleteSusan
Sooooo cute & a great job! Thank you for sharing your creativity at Potpourri Friday!
ReplyDeleteJust wanted to hop back and let you know that I will be featuring your pumpkins among my Fall features on Share Your Cup later today.
ReplyDeleteHugs,
Jann